Difference between revisions of "ZuluGoogleAPISetup"
| (3 intermediate revisions by the same user not shown) | |||
| Line 7: | Line 7: | ||
<br> | <br> | ||
<b>Step 2</b> Click Create Project. On the next screen name the project. You do not need to select an organization. Click Create.<br> | <b>Step 2</b> Click Create Project. On the next screen name the project. You do not need to select an organization. Click Create.<br> | ||
| − | [[File:Step1.png]]<br> | + | [[File:Step1.png|x300px]]<br> |
| − | [[File:Step2.png]]<br> | + | [[File:Step2.png|x300px]]<br> |
<br> | <br> | ||
<b>Step 3</b> Back on the Dashboard, click on Enable APIs And Services. On the next page, scroll down the page till you see Google Calendar API, click it, and on the next page click Enable<br> | <b>Step 3</b> Back on the Dashboard, click on Enable APIs And Services. On the next page, scroll down the page till you see Google Calendar API, click it, and on the next page click Enable<br> | ||
| − | [[File:Step3.png]]<br> | + | [[File:Step3.png|x300px]]<br> |
| − | [[File:Step3a.png]]<br> | + | [[File:Step3a.png|x300px]]<br> |
<br> | <br> | ||
<b>Step 4</b> On the Overview page, look for the Google Calendar API, click on Create Credentials<br> | <b>Step 4</b> On the Overview page, look for the Google Calendar API, click on Create Credentials<br> | ||
| − | [[File:Step4.png]]<br> | + | [[File:Step4.png|x300px]]<br> |
<br> | <br> | ||
<b>Step 5</b> Select the choices in the screen shot below and click "What Credentials Do I need?"<br> | <b>Step 5</b> Select the choices in the screen shot below and click "What Credentials Do I need?"<br> | ||
| − | [[File:Step5.png]]<br> | + | [[File:Step5.png|x300px]]<br> |
<br> | <br> | ||
<b>Step 6</b> You should be prompted to set up the OAuth Consent screen, select that option and this should open in a new window/tab. For User Type, select External and click create.<br> | <b>Step 6</b> You should be prompted to set up the OAuth Consent screen, select that option and this should open in a new window/tab. For User Type, select External and click create.<br> | ||
| − | [[File:Step6.png]]<br> | + | [[File:Step6.png|x300px]]<br> |
<br> | <br> | ||
<b>Step 7</b> On the OAuth consent screen, Enter Zulu as the Application name. You do not need to include an Application logo, the support email should be set as the email you signed in with. For Scopes for Google APIs click add scope and select all Google Calendar API options see screen shot. | <b>Step 7</b> On the OAuth consent screen, Enter Zulu as the Application name. You do not need to include an Application logo, the support email should be set as the email you signed in with. For Scopes for Google APIs click add scope and select all Google Calendar API options see screen shot. | ||
| − | [[File:Step7.png]]<br> | + | <br> |
| + | [[File:Step7.png|x300px]]<br> | ||
<br> | <br> | ||
For Authorized Domains, enter "360works.com". For Application homepage enter "https://360works.com/filemaker-calendar/". Leave the Privacy policy and Terms of Service fields blank. Once completed your page should look similar to the below screen shot. Once it does, click Save and close that window. <br> | For Authorized Domains, enter "360works.com". For Application homepage enter "https://360works.com/filemaker-calendar/". Leave the Privacy policy and Terms of Service fields blank. Once completed your page should look similar to the below screen shot. Once it does, click Save and close that window. <br> | ||
<br> | <br> | ||
| − | [[File:Step7a.png]]<br> | + | [[File:Step7a.png|300px]]<br> |
| + | <br> | ||
| + | <b>Step 8</b> Back on the Credentials page, Name your credentials (can be anything) and enter in "http://zuluauth.360works.com/zuluauth/auth" as the redirect URI and click refresh and then Create OAuth Client ID. Once they have been created, click Download. | ||
<br> | <br> | ||
| − | + | [[File:Step8.png|400px]]<br> | |
| − | [[File:Step8.png]]<br> | ||
<br> | <br> | ||
<b>Step 9</b> Open the downloaded file in a text editor<br> | <b>Step 9</b> Open the downloaded file in a text editor<br> | ||
Latest revision as of 15:21, 20 May 2020
Overview
By default Zulu will use the 360Works Google API key in order to make API calls to Google Calendar. Each Google API key has a set daily limit of API calls that can be made with it so if you use the default 360Works key which can be used by all Zulu users, it is possible that the daily limit will be reached and Zulu will stop working for that day (limit is reset every day at midnight Pacific time). For this reason we highly recommend that you generate your Google API key so that you will have your own daily limit and much less likely to lose syncing capabilities due to the limit being reached. This documentation will guide you to create you own keys
Generate you own keys
Step 1 Go to https://console.developers.google.com/ . If you do not already have a Google account, you will need to create one. It is recommended that if you are setting this up that you go ahead and create a new account with a username and password that you are comfortable sharing with your users/co-workers
Step 2 Click Create Project. On the next screen name the project. You do not need to select an organization. Click Create.


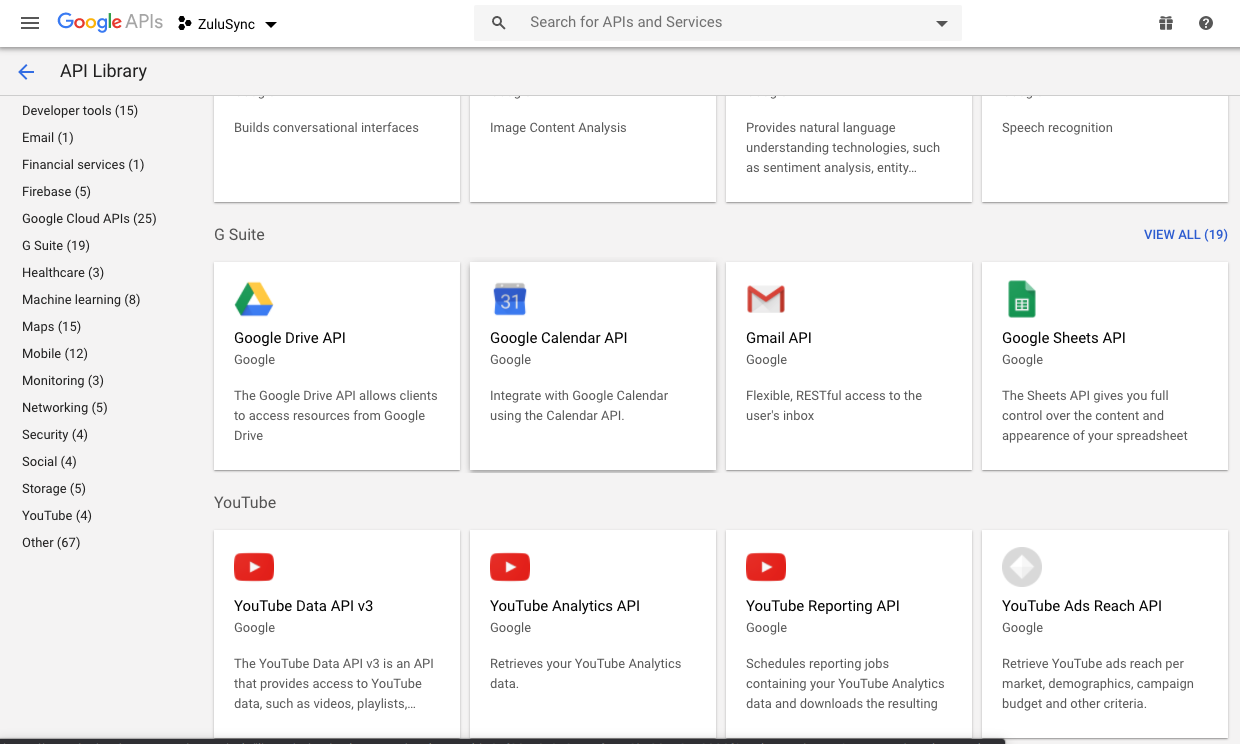
Step 3 Back on the Dashboard, click on Enable APIs And Services. On the next page, scroll down the page till you see Google Calendar API, click it, and on the next page click Enable


Step 4 On the Overview page, look for the Google Calendar API, click on Create Credentials

Step 5 Select the choices in the screen shot below and click "What Credentials Do I need?"

Step 6 You should be prompted to set up the OAuth Consent screen, select that option and this should open in a new window/tab. For User Type, select External and click create.

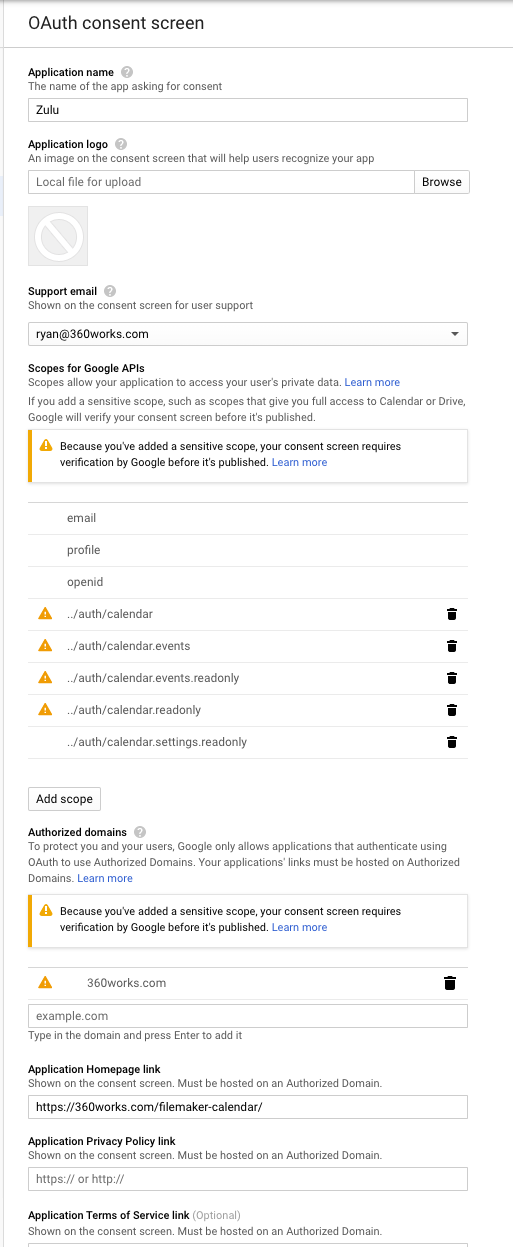
Step 7 On the OAuth consent screen, Enter Zulu as the Application name. You do not need to include an Application logo, the support email should be set as the email you signed in with. For Scopes for Google APIs click add scope and select all Google Calendar API options see screen shot.

For Authorized Domains, enter "360works.com". For Application homepage enter "https://360works.com/filemaker-calendar/". Leave the Privacy policy and Terms of Service fields blank. Once completed your page should look similar to the below screen shot. Once it does, click Save and close that window.

Step 8 Back on the Credentials page, Name your credentials (can be anything) and enter in "http://zuluauth.360works.com/zuluauth/auth" as the redirect URI and click refresh and then Create OAuth Client ID. Once they have been created, click Download.

Step 9 Open the downloaded file in a text editor
Step 10 Open the Zulu.xml file in a text editor. The Zulu.xml file is found at /Library/360Works/Applications/conf/Catalina/localhost/zulu.xml on Mac and C:\Program Files\360Works\Applications\conf\Catalina\localhost/zulu.xml on Windows . Look for the section that says "Customize these parameters to use your own Google Calendar API key"
Step 11 Go back to the credentials file and copy the value for "client_ID" and paste it in for the value for the "google.client.id" parameter in the zulu.xml file. Go back to the credentials file and copy the value for the "client_secret" and then paste it in for the value of the "google.client.secret" parameter in the zulu.xml file. and then save the zulu.xml file
Step 12 Restart Zulu using the 360Works Admin utility found in /Applications on Mac and C:\Program Files\360Works on Windows. Launch the file, select Zulu and click Stop and then Start.